Repairing Scratched or Damaged Acrylic Windows
Caravan windows are made from acrylic, and whilst acrylic is a robust material its kryptonite is its susceptibility to scratching. Just washing the van with a broom will leave fine marks over the windows and sometimes just looking at them with an angry face seems to scratch them.
Traveling about in our relentless quest for caravaning Nirvana, we tend to squeeze the Behemoth into places which are often far to small for it, and as a result our windows do cop a bit of a flogging. I needed a simple cost effective and doable remedy to make those window shine again, short of replacing them with new windows.
Researching the InterGoogleWeb offered all sorts of shonky sounding, uninspiring and typical 3rd hand remedies all of which that I was reluctant to launch into. After all I can still see though the windows, they are very expensive and I didnt want to destroy them entirely.
It’s always better to practice on someone else’s van before you tackling your own. Attacking a scratched acrylic van window is not for the faint of heart, and a lack of knowledge could end very badly.
What we need is a test monkey who will throw caution to the wind and by a process of trial and error, risk his own windows to find and perfect a simple fool proof method that everyone can share. Well, say hi your test monkey, Im right here. I took the plunge, did the hard yards and played with the devil … but Ive come out the other side with a tested fool proof method for me to remove scratches safely and easily with confidence.
Plasweld, a Victorian plastics supplier in Castlemaine have a page detailing their recommended acrylic scratch removal method. In short, depending on the severity of the damage it’s recommended removing the scratches with wet and dry, first a 800 grit then a 1500 grit until the scratch has been removed; completing the process by polishing the window with Brasso.
The Plasweld method is effective but it didn’t work for me, simply because the endurance required to complete it by hand is far too exhausting, and requires arm at least of an Olympic level arm wrestler. What the Plasweld method did do was give me a qualified and credible starting point, which gave me the confidence to develop what is for me a fool proof and easy polishing method that hasn’t failed me yet.
My window scratches had no lip that I could catch with a finger nail, which is said to be the test point of a deep scratch. Id already used the 800/1500 wet and dry process because I’d jumped straight into the Plasweld procedure by hand, and was forced to stop when I started developing arms like Popeye, and cramping up.
Deep scratches will require working up with wet and dry from an 800 grit or even a 600 if it’s deep. Wherever you start, you still working through steps in paper grit to finish off with the 1500 or even 1800 grit. You cant really successfully skip a step. With deep scratches this system works and works very well, but make no mistake do not step into this sanding process lightly. Be forewarned there are no short cuts here, and its bloody hard long labour intensive physical work.
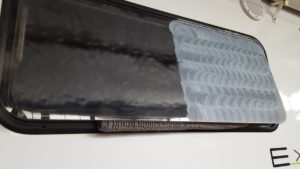
With wet and dry, firstly soak the paper well and lightly mist the window, then with a even pressure across the paper polish in a circular motion where a slurry will form. The final fine 1500/1800 wet and dry should leave the acrylic clouded as on the left of the window in the above pic, but there should be no visible scratches before moving to the liquid polish.
Fine shallow unedged scratches and scuffs don’t require the labour intensive wet and dry step, and to be honest even with a mildly deeper scratch you can still skip the wet and dry step if your not comfortable; the window will still be nice and clear just the scratch itself will remain visible.
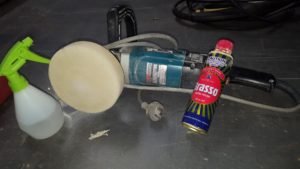
The liquid polishing process is the same whether you go straight to the step skipping the wet and dry, or work up to it from the wet and dry. The final liquid polishing process that I was ultimately happy with and subsequently used on all the other windows successfully came from the use of an electric polisher with a 150mm x 50mm foam polishing pad, a water filled atomiser and a can of Brasso (or its cousin Silvo for a slightly less aggressive polish).
This is the liquid polishing process that works very well for me
On a washed, clean and dry window put the Brasso on neat and with a clean soft rag in a circular motion, polishing/applying in circles around 100mm in diameter. Although this step cant help but start the polishing process, it’s more about applying the Brasso than the polishing of the window at this point. Dont be shy about the amount of Brasso you apply, more is better just not to the point of the Brasso running off the van. The applied Brasso will dry off as you continue to apply the Brasso across the window. You dont need to do sections, I have one huge window and have no issues completing the process in one process
When the window is completely covered in Brasso, soak the polishers foam pad in clean water and then spin off the excess water leaving the pad nice and damp. Hold the pad square to the window, its very important to keep the foam pad uniform on the window and apply even flat pressure across the polishing pad. I have a large Makita polisher but this will work with any polisher. My polisher runs at a max output of 1200w, and Im using it at just under half max speed.
Its important to use a positive controlled pressure on the polishing pad, don’t just let the polisher hover over the window. I use enough pressure to almost compress the 50mm foam pad to half its thickness; again, the only vital point in this process is maintaining an even flat pressure, and a light mist of water.
Start with slow moving overlapping passes horizontally over the full window. After each full window buff, lift the polisher and very, very lightly mist enough water from the atomiser to just dampen the window. If the misting starts to bead then there is to much water. Too much water will just lesson the effect of the polishing and you’ll likely have to repeat the job. After the light mist repeat the slow overlapping polishing pass, this time vertically.
Repeat this horizontal and vertical polishing misting very lightly in between. Somewhere around 4 or 5 cycles there will be no slurry and the water will bead and run off regardless of how little you mist, and the Brasso will have completely washed away and only water and a beautiful clear window will be left.
That’s pretty much it, you’ve only the clean up left.
Just throw some clean water over the window and side of the van to clean it up, and now your ready to find some new branches to scratch them up again. There isn’t a limit to amount of times you can polish the windows, Ive polished some of mine 5 times now.
A video of this process is at the bottom of the page, and hopefully a combination of the video and the above text will provide the knowledge and confidence to take a shot. With one small caravan window costing upwards of $300 to $500 plus installation, the ability to easily and confidently polish out scratches from your windows is a very handy and cost effective skill to have.
If somethings unclear drop us a email and we’ll try to clear it up.
Along with some clean rags, these are all the tools you’ll need
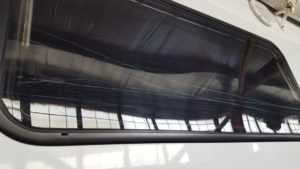
To go from this ………….
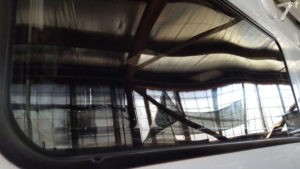
………… to this, with ease


